
1关闭防火墙和SELINUX
2sshd优化
3ulimits优化
4内核参数优化
5修改history记录格式
6设置默认字符界面启动
7设置时区
8关闭无用服务
9配置chronyd服务
关闭防火墙和SELINUX
systemctl stop firewalld
systemctl disable --now firewalld
sed -i s#SELINUX=enforcing#SELINUX=disabled#g /etc/selinux/config
setenforce 0
sshd优化
vi /etc/ssh/sshd_config
UseDNS no
GSSAPIAuthentication no
# 重启sshd服务
systemctl restart sshd</div>
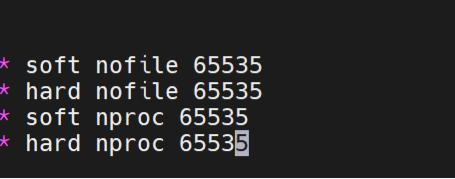
ulimits优化
/etc/security/limits.conf,调整进程数量和文件描述符,配置后退出会话ctrl+D,ulimit -a查看
nproc:表示每个用户允许创建的最大进程数
nofile:表示每个用户能够打开的最大文件数
soft:软限制,表示用户可以在不超过此值的情况下,调整该限制。
hard:硬限制,表示系统允许的最大进程数,不能超过这个值。
vim /etc/security/limits.conf
* soft nofile 65535
* hard nofile 65535
* soft nproc 65535
* hard nproc 65535
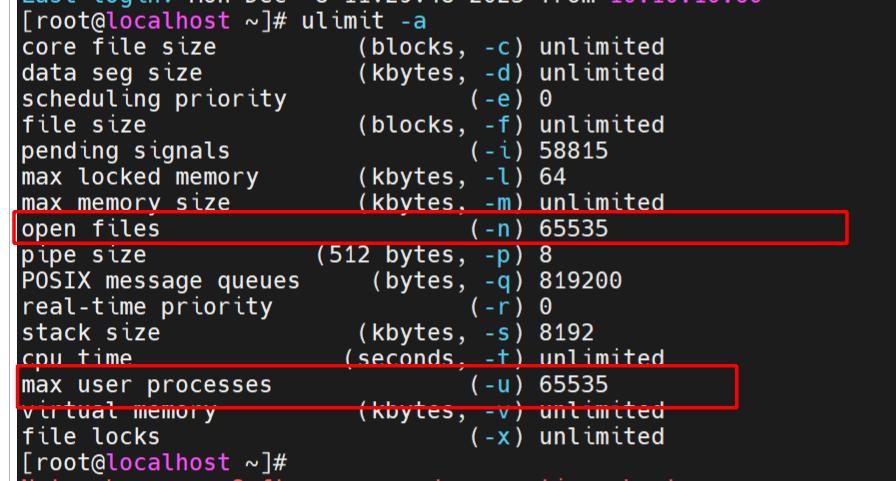
重新启动会话后,查看ulimit
内核参数优化
vi /etc/sysctl.conf
# 更积极的使用内存,而不是swap
vm.swappiness=10
# 整个系统使用的文件描述符总数
fs.file-max = 2000000
kernel.shmmni = 32000
kernel.msgmnb = 163840
kernel.msgmax = 81920
# 保持长连接发送探测包时间,默认是2小时
net.ipv4.tcp_keepalive_time = 300
# 在tcp_keepalive_time之后,没有接收到对方确认,继续发送保活探测包次数,默认值为9
net.ipv4.tcp_keepalive_probes = 10
# KeepAlive探测包的发送间隔,默认值为75
net.ipv4.tcp_keepalive_intvl = 30
# 端口范围,默认值32768~60999
net.ipv4.ip_local_port_range = 1024 65535
# TCP监听队列长度,默认是128
net.core.somaxconn = 4096
# 连接处于SYN_RECV状态的最大值
net.ipv4.tcp_max_syn_backlog = 8192
# 当接口接收到比内核处理速度更快的数据包时,在INPUT端排队的最大数据包数,默认1000
net.core.netdev_max_backlog = 30000
# 发送缓冲区的默认值
net.core.wmem_default = 16777216
# 接收缓冲区的最大值
net.core.rmem_max=16777216
# 发送缓冲区的最大值
net.core.wmem_max=16777216
# max(tcp_wmem) * 2 * 500 / 4096,可能同时有500个客户端
net.ipv4.tcp_mem = 4096000 4096000 4096000
# 每个socket占用的缓冲区的最小值、默认值和最大值
net.ipv4.tcp_rmem=4096 87380 16777216
net.ipv4.tcp_wmem=4096 87380 16777216
# 连接处于FIN_WAIT_2的时间,默认是60s
net.ipv4.tcp_fin_timeout = 20
# 开启TIME-WAIT连接重用,默认为2
net.ipv4.tcp_tw_reuse = 1
# 回复SYN+ACK并等待对方ACK确认,如果超时重传的次数,默认值为5
net.ipv4.tcp_synack_retries = 2
# 在发送SYN后等待SYN+ACK,如果不回复再次发送的次数,默认值为6
net.ipv4.tcp_syn_retries = 2
立即生效
sysctl --system或者sysctl -p,都是无需重启的
sysctl -a查看
修改history记录格式
vi /etc/profile
USER_IP=`who -u am i 2>/dev/null| awk '{print $NF}'|sed -e 's/[()]//g'`
export HISTTIMEFORMAT="%Y-%m-%d %H:%M:%S `whoami`@${USER_IP}: "
export HISTFILESIZE=1000000
export PROMPT_COMMAND="history -a; history -r; $PROMPT_COMMAND"
shopt -s histappend
# 立即生效
source /etc/profile
设置默认字符界面启动
# 模式使用字符界面启动,如果需要图形界面可以手动切换
systemctl set-default multi-user.target
# 查看启动模式systemctl get-default
# 切换图形界面
systemctl set-default graphical.target
# 登录到root用户执行startx命令
设置时区
# 设置时区为上海
timedatectl set-timezone Asia/Shanghai
# 查看时区
timedatectl
关闭无用服务
重点查看服务是否可以关闭,是否还有其他服务可以关闭。

redhat8.9需要关闭4个服务

systemctl disable --now libvirtd-admin.socket

systemctl disable --now libvirtd-ro.socket

systemctl disable --now libvirtd.socket

systemctl disable --now libvirtd.service
# ABRT相关服务Automatic Bug Reporting Tool
systemctl disable --now abrt-ccpp.service
systemctl disable --now abrt-oops.service
systemctl disable --now abrt-xorg.service
systemctl disable --now abrtd.service
service auditd stop
systemctl disable auditd
# 自动发现局域网中服务,例如打印机、共享
systemctl disable --now avahi-daemon.socket
systemctl disable --now avahi-daemon.service
# 蓝牙服务
systemctl disable --now bluetooth.service
# kvm虚拟化服务
systemctl disable --now libvirtd.service
# 调制解调服务
systemctl disable --now ModemManager.service
# 邮件服务
systemctl disable --now postfix.service
# 订阅升级服务服务
systemctl disable --now rhsmcertd.service
# 性能调优服务
systemctl disable --now tuned.service
# vdo磁盘服务,vdo是一个具有重删功能的磁盘
systemctl disable --now vdo.service
配置chronyd服务
# 如果需要保持冗余效果,建议配置3个服务器,如果无3个服务器可以配置一个,禁止配置两个。
vim /etc/chrony.conf
server ntp1.aliyun.com iburst
systemctl enable --now chronyd.service
# 检查配置
chronyc sources -v
#如果是内网环境,就需要拿一台服务器做时钟同步服务器,客户端连这个服务器实现时钟同步。
这里以三个服务器举例,
192.168.101.51 服务器
192.168.101.52 客户端
192.168.101.53 客户端
服务器配置:
<img src="https://www.hankz.net.cn/wp-content/uploads/2025/06/1765177315-image.webp" alt="" width="1152" height="1190" class="alignnone size-full wp-image-1193" />
server 本地的ip iburst
# 时间漂移文件(记录系统时钟的漂移量,提升同步精度)
driftfile /var/lib/chrony/drift
# 日志目录(存放chrony的运行日志)
logdir /var/log/chrony
# 授权指定子网的客户端同步时间(替换为实际子网)
allow 192.168.101.0/24
#配置系统时钟偏差调整
makestep 1.0 3
# 启用内核对实时时钟(RTC)的同步。
rtcsync
客户端配置:
<img src="https://www.hankz.net.cn/wp-content/uploads/2025/06/1765177404-image.webp" alt="" width="919" height="296" class="alignnone size-full wp-image-1194" />
验证:
<img src="https://www.hankz.net.cn/wp-content/uploads/2025/06/1765177432-5129.webp" alt="" width="2361" height="1148" class="alignnone size-full wp-image-1195" />
虽然内网也能搭建时钟同步服务器,但是会存在多多少少都会存在时间漂移的情况,即使rtcsync写入硬件时钟。所以如果生产还是比较在意这一点,最好还是让时钟同步服务器与公共ntp服务器连,解决时间校准问题。
© 版权声明
文章版权归作者所有,未经允许请勿转载。
相关文章

暂无评论...